Installation Guide
Note: this guide was built on stillOS 10.2
Support Channels
If you need any help with stillOS, the installation process, or tech in general, feel free to connect with us.
Discord: https://discord.gg/AcuxkKhGwM
Forums: https://community.stillhq.io
Backup your data (IMPORTANT)
NOTE: This step should not be skipped
One simple way to perform a backup is to copy your important files to an external drive, USB flash drive, or a cloud location like Google Drive.
Creating the Bootable USB
The easiest way to install stillOS is to use a USB stick. You need at least a 4 GB stick that has no personal data, as all data on the USB stick will be lost.
Installing Fedora Media Writer
Refer to your current operating system that you will be using to flash the USB.
Linux
Fedora and derivatives (Silverblue, Universal Blue, Ultramarine, etc)
- Use your preinstalled app store (Software for GNOME, Discover for KDE) and search for "Fedora Media Writer".
Other Distros
- Use Flathub to install Fedora Media Writer. You might need to refer to your distribution's documentation to install flatpak and add Flathub as a repository.
Windows
- Go to the Fedora Silverblue download page: https://fedoraproject.org/atomic-desktops/silverblue/download/
- Scroll down to the "Fedora Media Writer" section
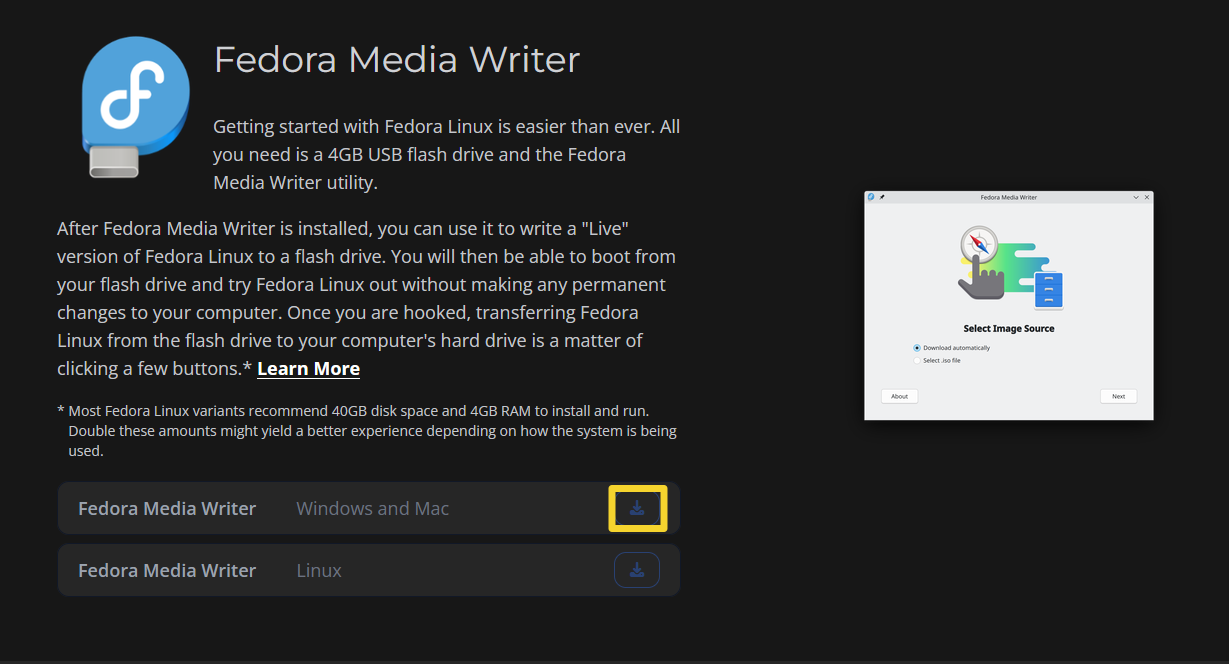
- Click the download icon next to "Windows and Mac" (as shown in yellow)
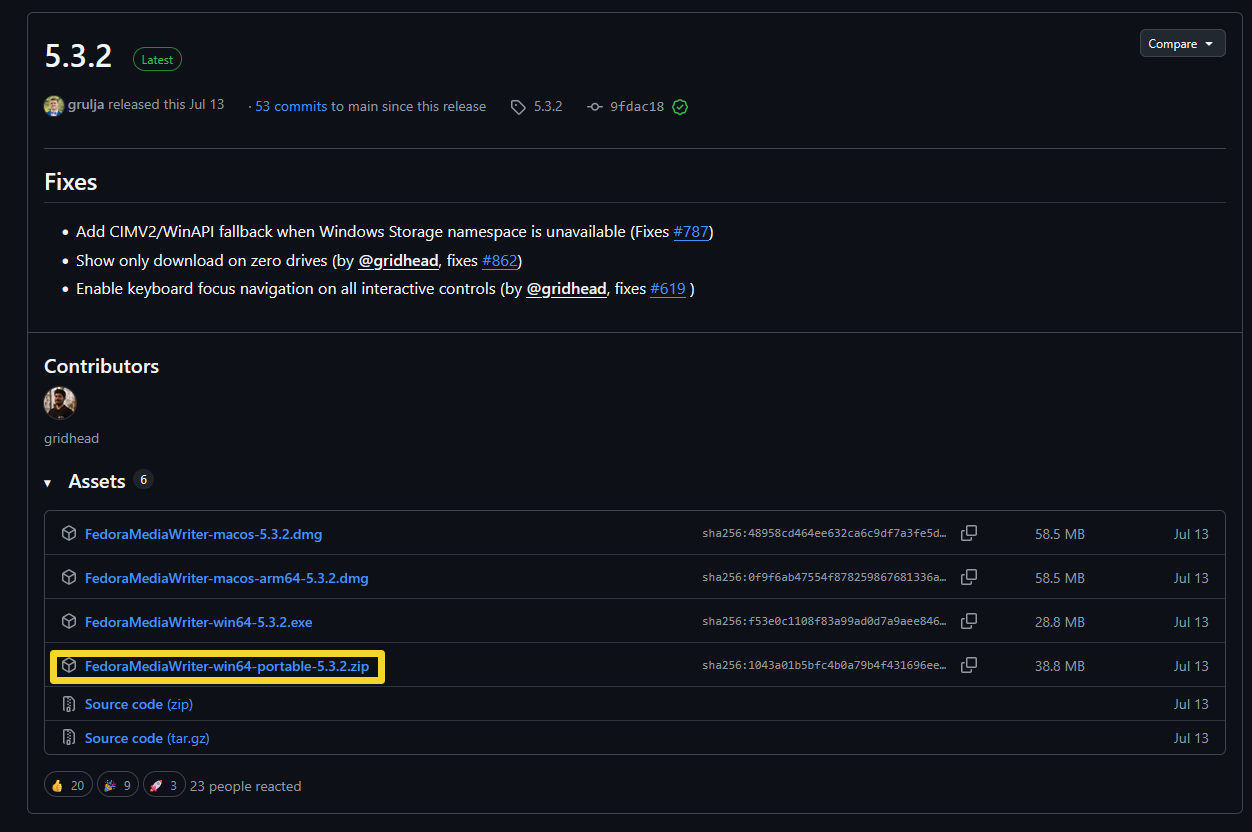
- Click the "portable" version to download that specific file (as shown in yellow), note that your version might be different from mine
- After the download, go to the location where the file has been downloaded (most likely the Downloads folder)
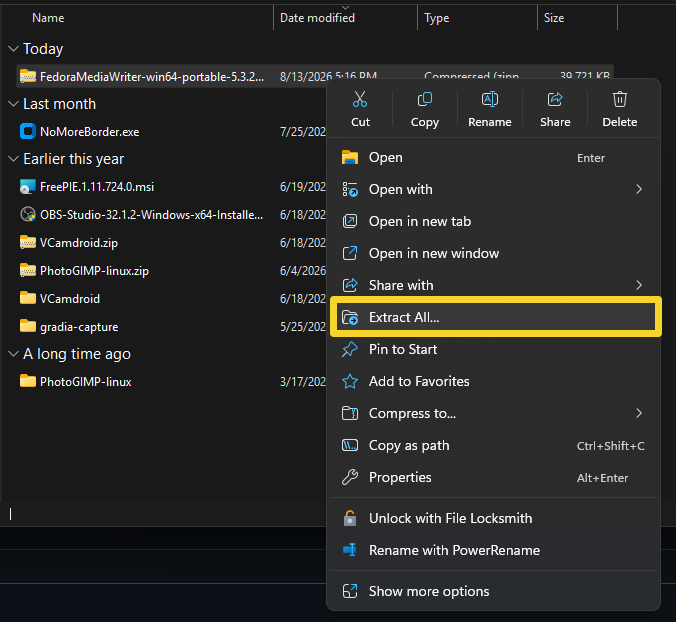
- Right click on the .zip, and click "Extract All..." (as shown in yellow)
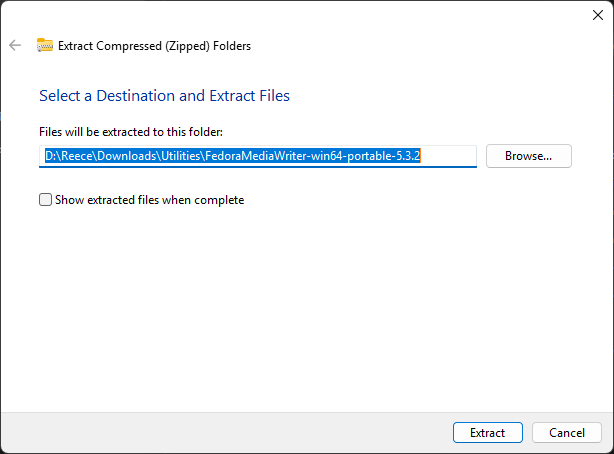
- Click "Extract". If "Show extracted files when complete" is checked, you should see a window after the extraction is complete.
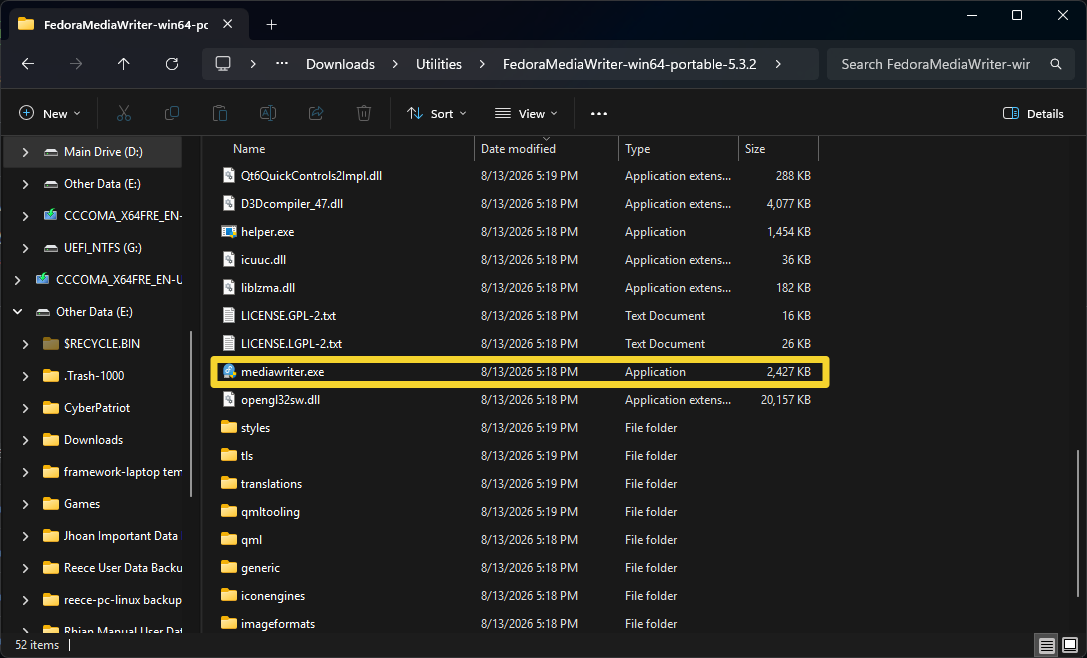
- Inside the folder of the extracted file, locate "mediawriter.exe".
- Double click that .exe and say "Yes" to the permission prompt if needed.
- You should see a window asking to select an image source, you can now move on to Flashing the ISO
Flashing the ISO
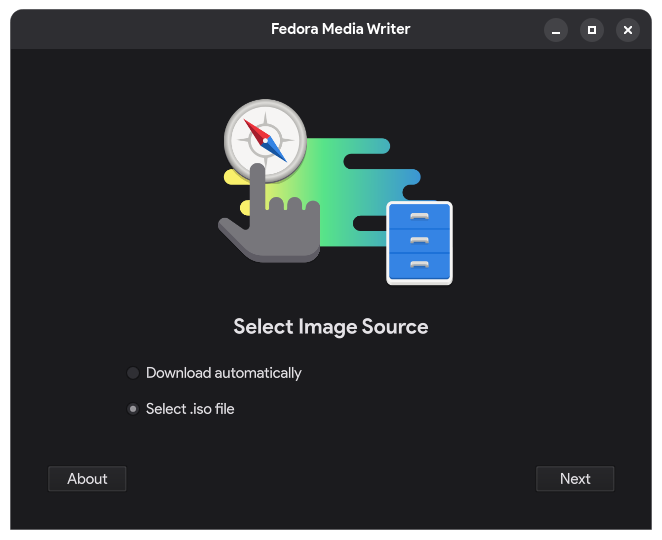
Click "Select .iso file", then click "Next".
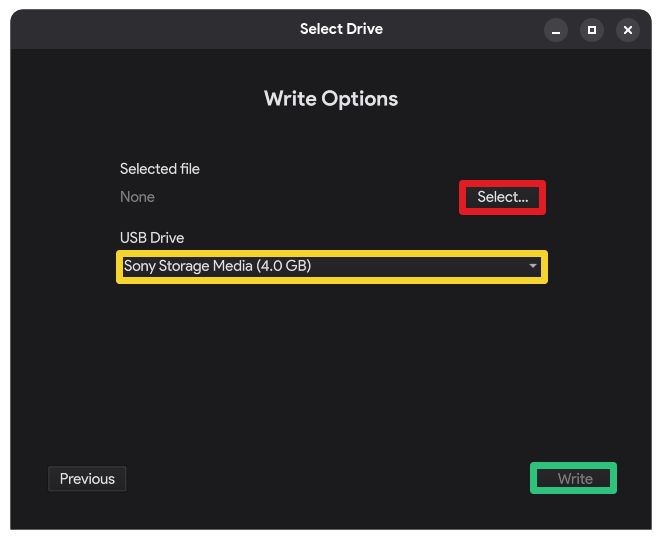
- Click the "Select..." button (as indicated in Red) to locate the ISO file you downloaded.
- Select your USB drive in the dropdown menu (as indicated in Yellow)
- Double check to make sure that this is the correct USB drive, as ALL DATA ON THE USB WILL BE LOST!
- Click "Write" (as indicated in Green) to flash the ISO
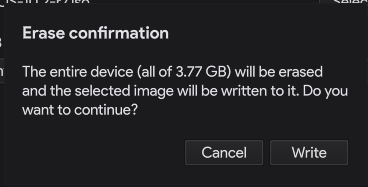
It will ask you whether you want to erase your drive.
If you are 100% sure that there is no important data on your USB stick, press "Write", or else press "Cancel" (this will cancel the flash).
Note: it might ask you for an admin password after clicking "Write". Enter the password so that your computer can flash the USB.
Now be patient as the USB is being flashed.
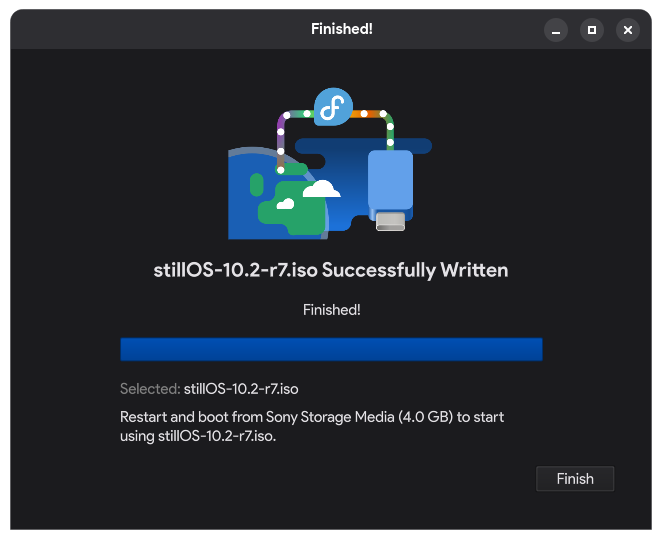
Once you see the "Finished!" screen, the flashing has been completed successfully, press "Finish" and close the app.
Note: Eject your USB stick before unplugging to prevent data corruption.
Partitioning your drive
If you are planning to dual boot on the same drive, refer to your operating system in the subsections below. If not, feel free to skip to Install StillOS.
Windows
Before proceeding, make sure you are logged into an admin user. If you are not sure, just continue through the steps. You will get the message "You do not have access rights to Logical Disk Manager" if you are not logged in as an admin. If that is the case, ask the person who set up your computer about how to get to the admin account.
Press Windows + R to get the run dialog
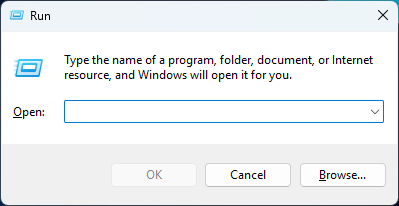
Once you see this window, delete whatever is in the text box and type "diskmgmt.msc", then press "Ok" or press Enter on your keyboard.
The computer will then show a prompt asking if you want this app to make changes to your device. Press "Yes" and/or enter the admin password if it is asking for one.
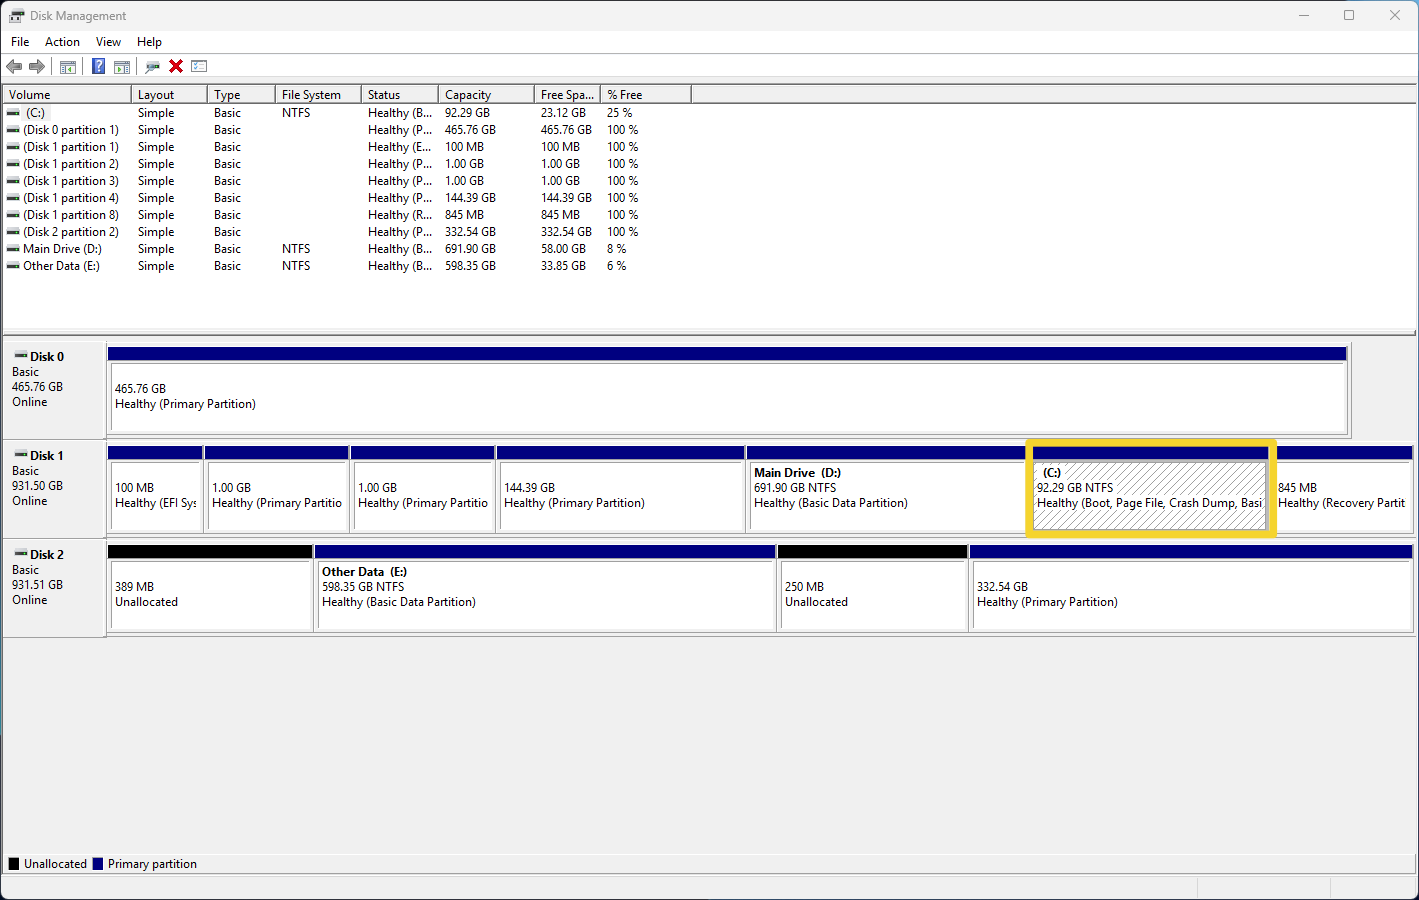
You should then see this window. Your device will likely have less disks and partitions than mine, so you will likely see only 1 disk and a few partitions. Right click on your C: drive (indicated in yellow).
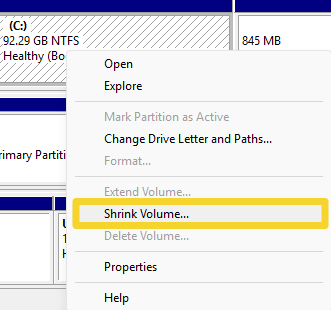
After you right click, you will click "Shrink Volume..." (as indicated in yellow) to make space for stillOS.
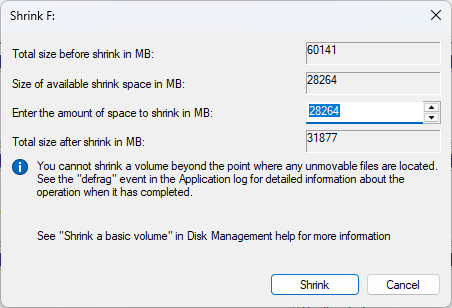
After you click that, wait for the computer to query available drive space, then you will see this window.
The important number we will change is the "Enter the amount of space to shrink in MB:". This will tell us how much we want to shrink the drive.
Another important value is the "Size of available shrink space in MB:", as it tells you how much you can shrink the drive.
For stillOS, the minimum disk space required is 25 GB (25000 MB), but we would recommend more to have enough space for apps and other files. For a 1 TB drive that is not full, we recommend shrinking the drive by 250 GB (250000 MB), which would be enough for storing some files and apps. Ultimately, the amount to shrink will depend on how much space you can shrink and your needs.
Note: The amount to shrink will not be able to exceed the available shrink space.
Tip: Search for "GB to MB" on Google to easily convert gigabytes to megabytes (or the other way around).
Once you are ready, press "Shrink".
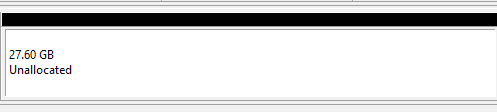
Once your computer successfully shrinks your C: Drive, you should see a new "Unallocated" section for your respective drive. Now, leave it alone as the installer will recognize that free space during the next step of installation. You are now free to close the app and get ready for the next step of the installation.
Install StillOS
If your computer is still on, refer to your operating system. If it is fully off, refer to Booting into the BIOS
Shut down Windows
- Close all applications
- Go to the Start Menu and go to your power menu as usual
- Before pressing the "Shut Down" button, hold down the shift key while clicking "Shut Down". If you do not perform this step, your computer will not be fully shut down, preventing you from entering the BIOS.
Booting into the BIOS
- Make sure your computer is off.
- Connect the USB stick to a USB port on your PC.
- Determine the BIOS key or boot menu key for your computer. This will depend on the model of your PC/Motherboard, so refer to your motherboard/PC maker to find the key.
Tip: A useful search term is "[insert model name] BIOS key" or "[insert model name] boot menu".
- Press the power button, then immediately start tapping the BIOS key or boot menu key, and keep tapping until you see a new menu screen.
Tip: if your computer reboots back into Windows, ensure that you have followed the steps earlier to shut down your computer fully, and that you are using the right BIOS/boot menu key.
BIOS Settings/Boot Menu
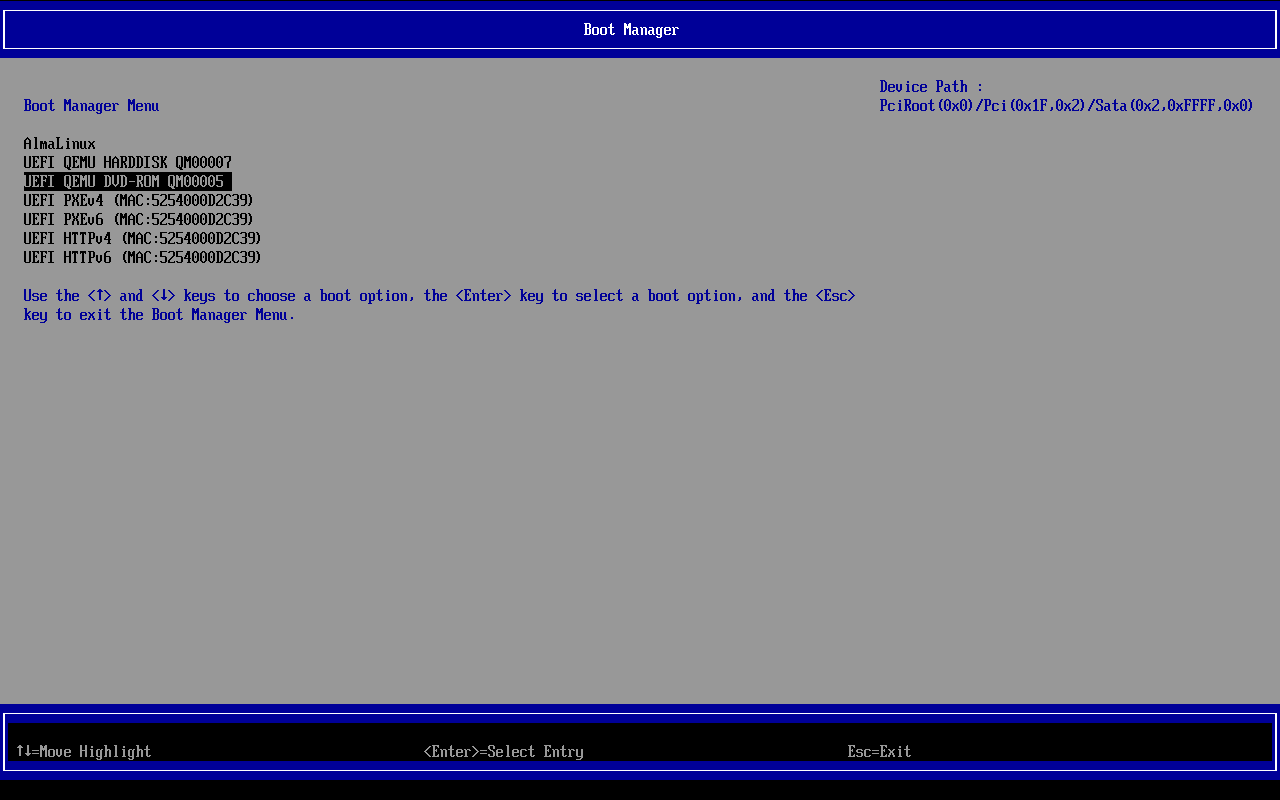 Note: Your BIOS and/or boot menu screen will likely look very different from this one.
For those who reached your BIOS settings, use the arrow keys, escape, and enter keys to locate the section relating to booting an external OS (called Boot Manager in my case), then locate your USB stick. If there is a duplicate option for UEFI, select the one with UEFI. It might also be called "USB External Boot" or similar.
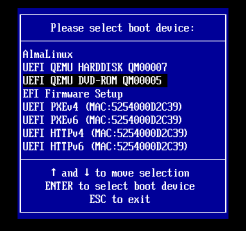
Note: Your boot menu will also certainly look different.
For those at the boot menu, just select the USB stick using the arrow and enter keys. If there is an option that includes UEFI, select that option. The option might also be a different name depending on your PC manufacturer.
Note: StillOS does not support Legacy/BIOS based systems. If you are unable to boot into the USB, your device might be unsupported.
Installer GUI
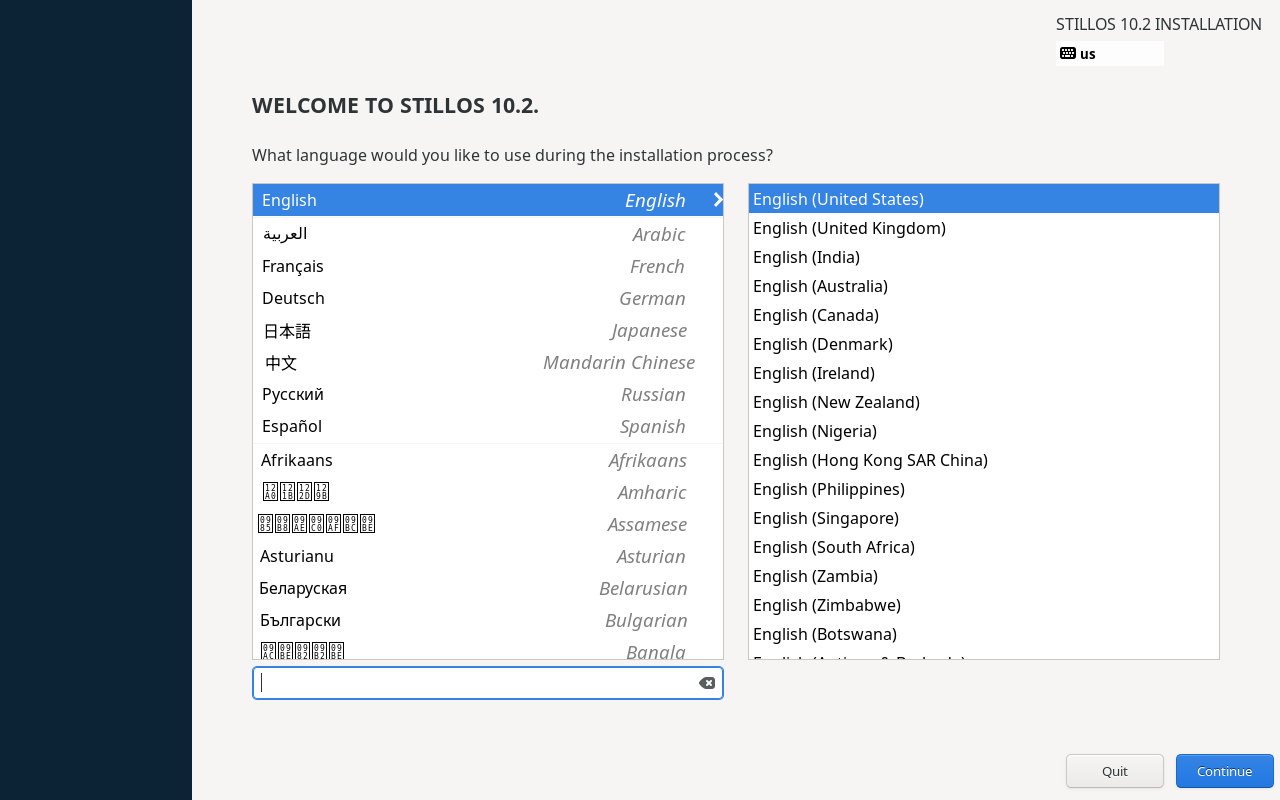
You should see a screen like this, select your language by selecting it on both the left and right side, then click "Continue".
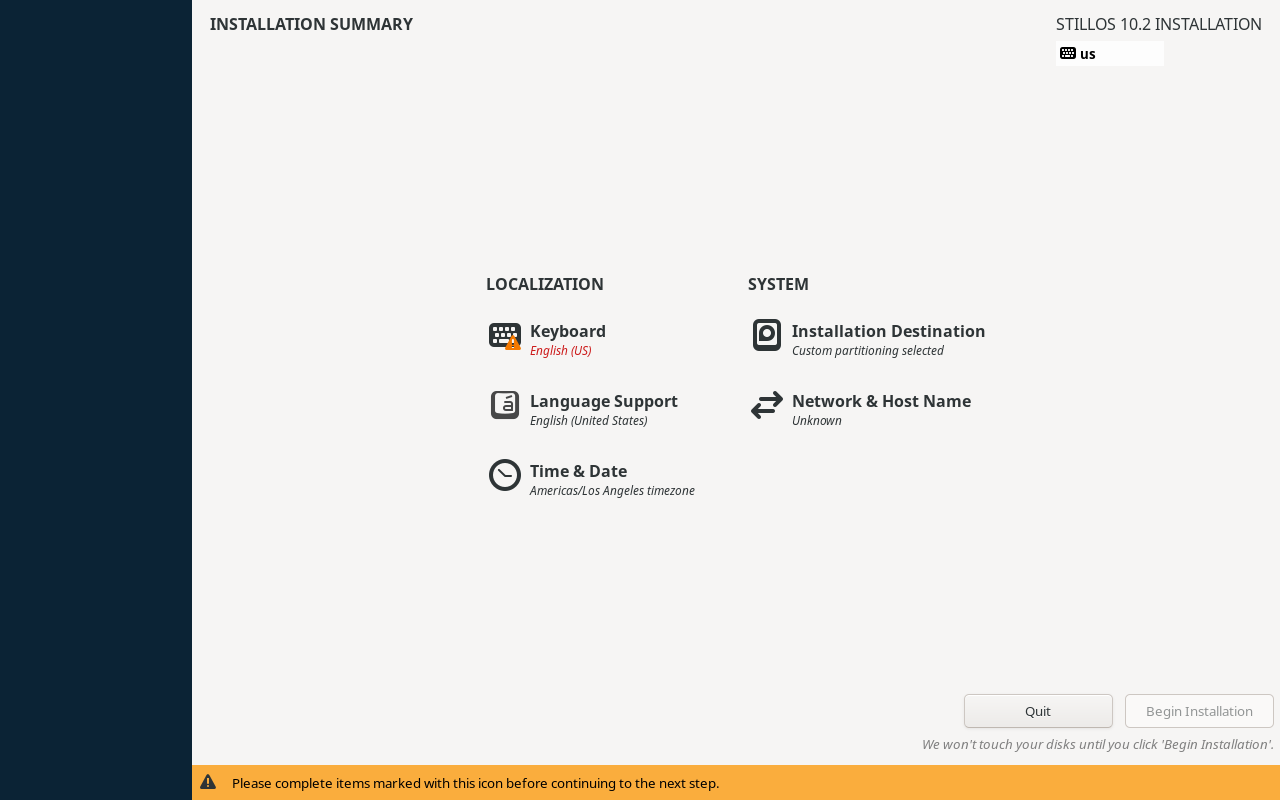
This should take you to the main install screen. To get to the installation in a concise manner, go to the sections that have a warning icon and/or red text, indicating that an action needs to be taken in that section.
Note: Once you are done with a section, click the "Done" button on the top left.
Installation Summary Screen
Keyboard
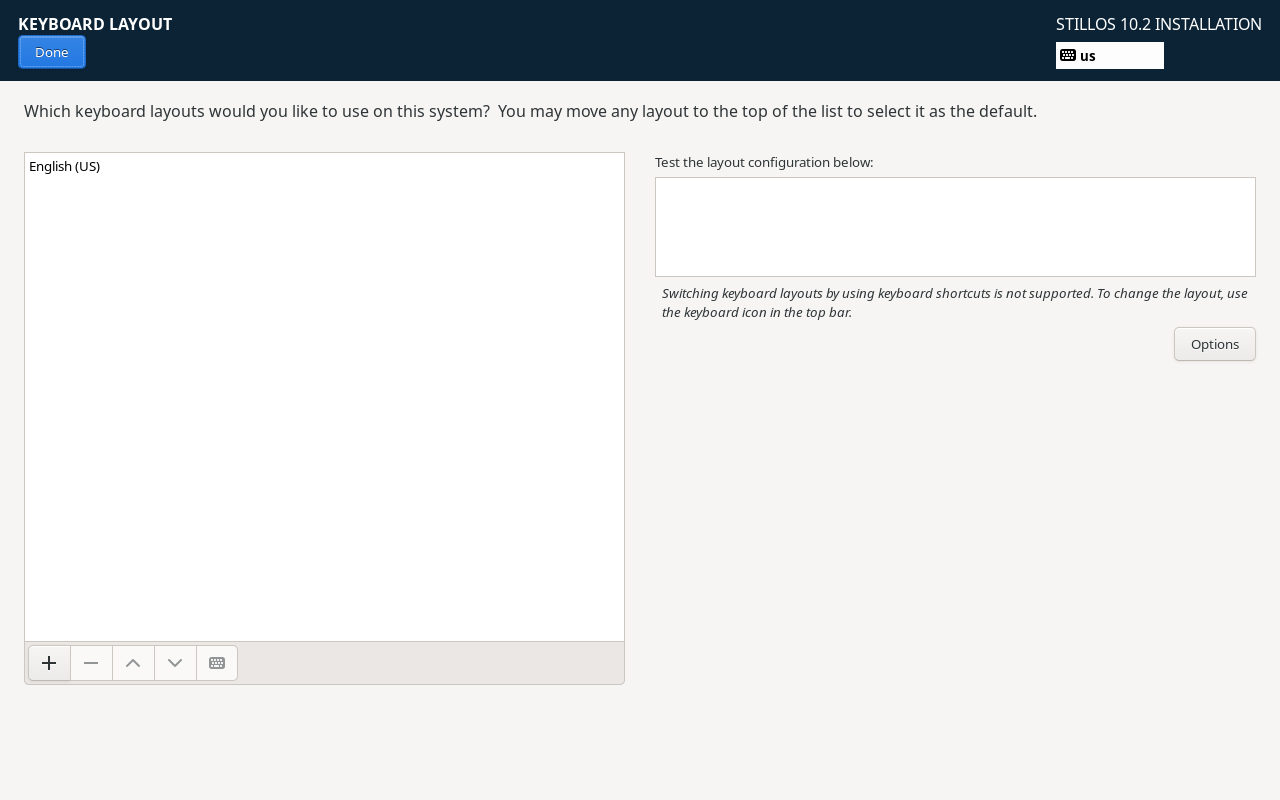 Select your keyboard layout above. If you want to add a layout, click the "+" icon to show the popup. To make it default, you click on the desired layout and press the up arrow until it is at the top.
Language Support
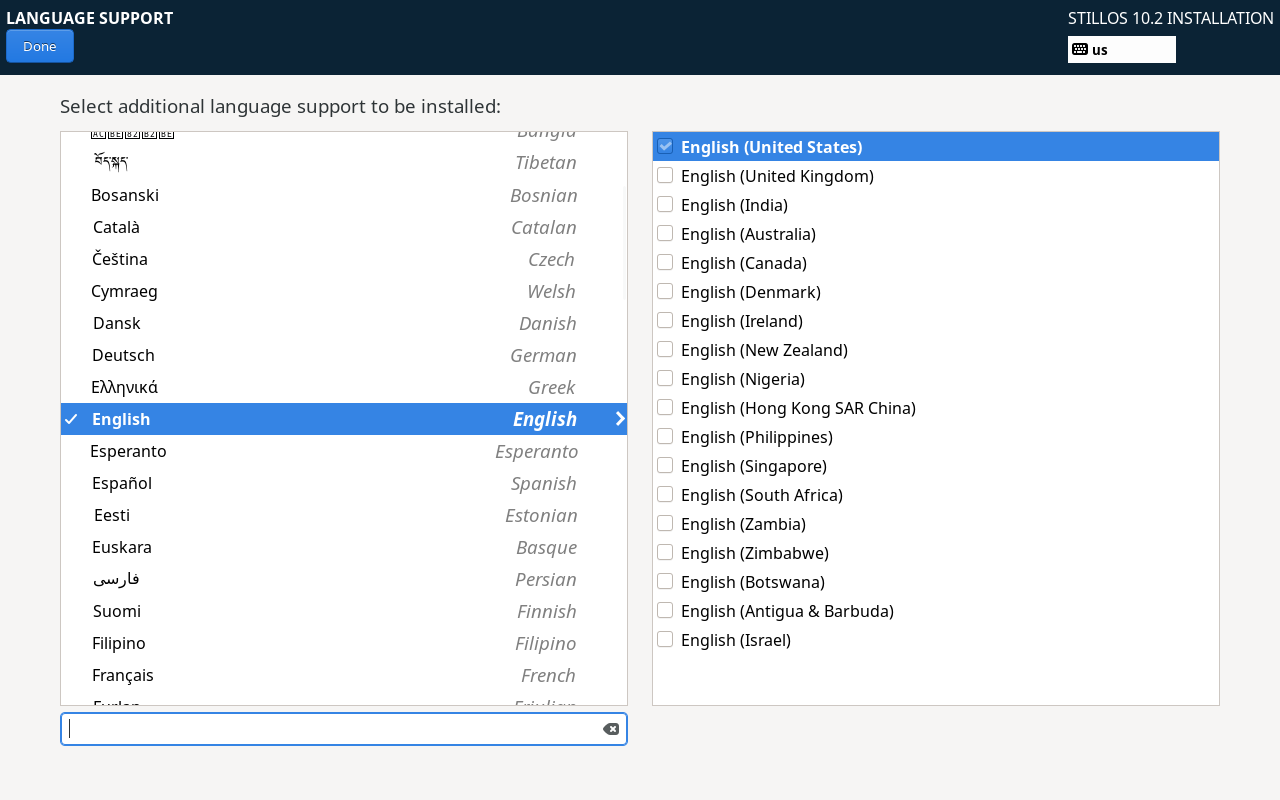 If you want to add more languages than just English, you can do so on this screen. The left side WILL NOT select the language, you need to also select your language on the right side (as indicated by the checkmark) for that language to be installed.
Time & Date
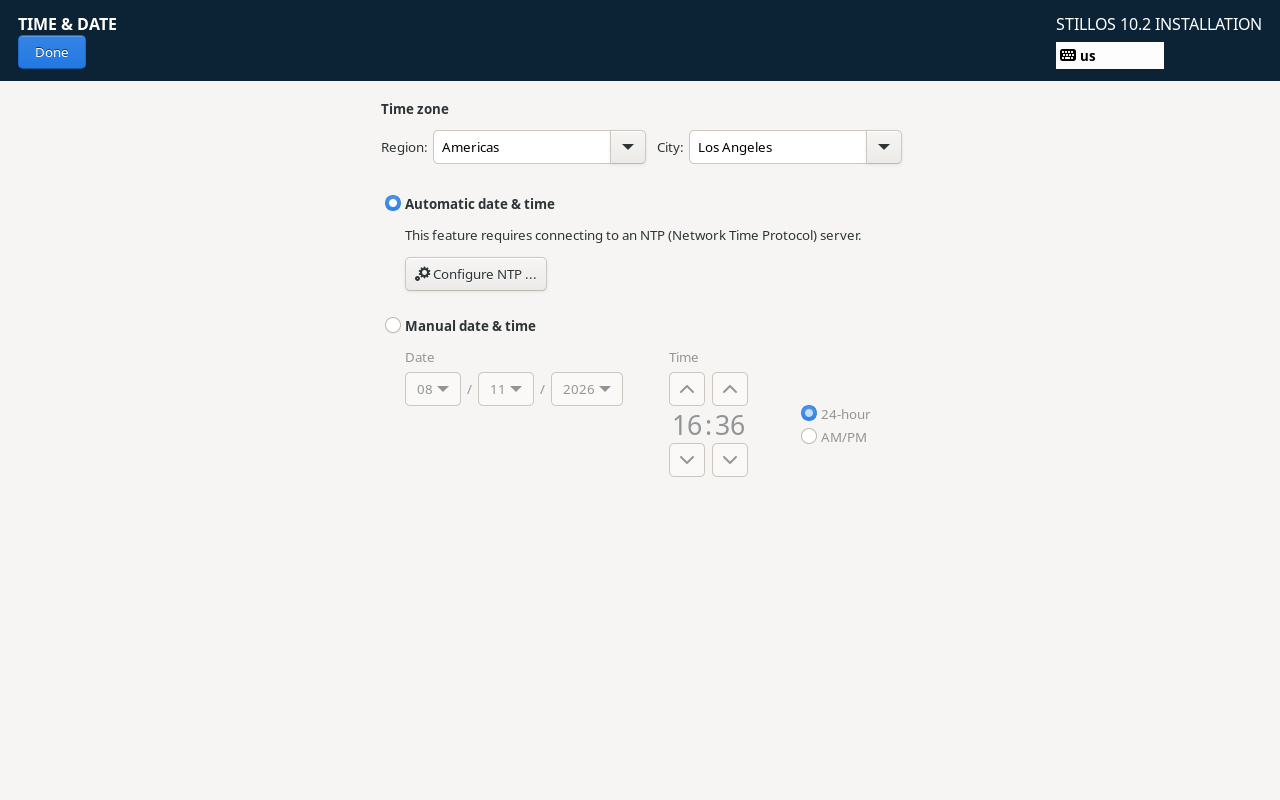 Select your time zone here.
Note: "Automatic date & time" will likely not work due to not having an internet connection. If that is the case, you can just set the time and date manually.
Installation Destination
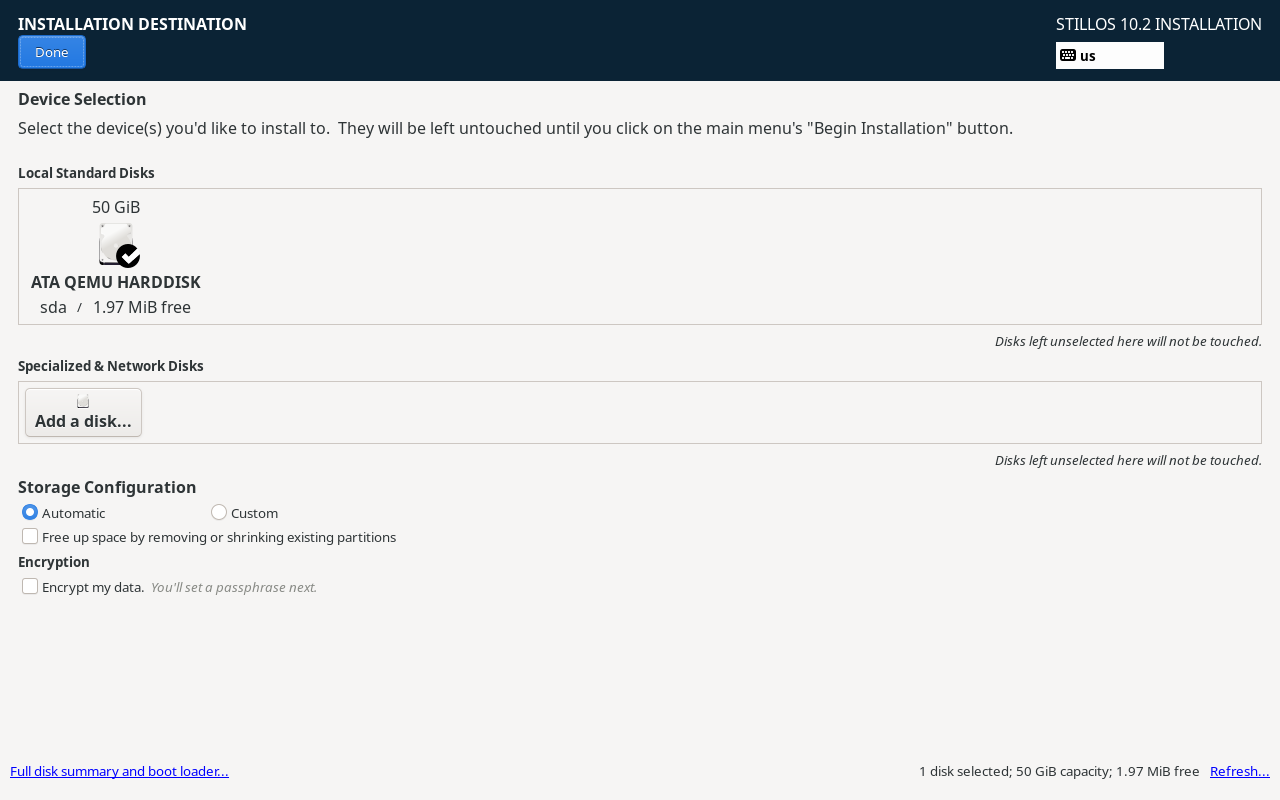 This is where you select the partition to install stillOS. If there is a checkmark on the partition already, it is already selected.
Important Note: Unless you select "Free up space by removing or shrinking existing partitions", the installer will not overwrite your exsiting OS.
Note: It is easier for users to partition their drives in their previous OS first. Therefore, we do not recommend using the "Custom" storage configuration option. If you still need to partition your drives, quit the installer and visit the Partitioning section.
Network & Host Name
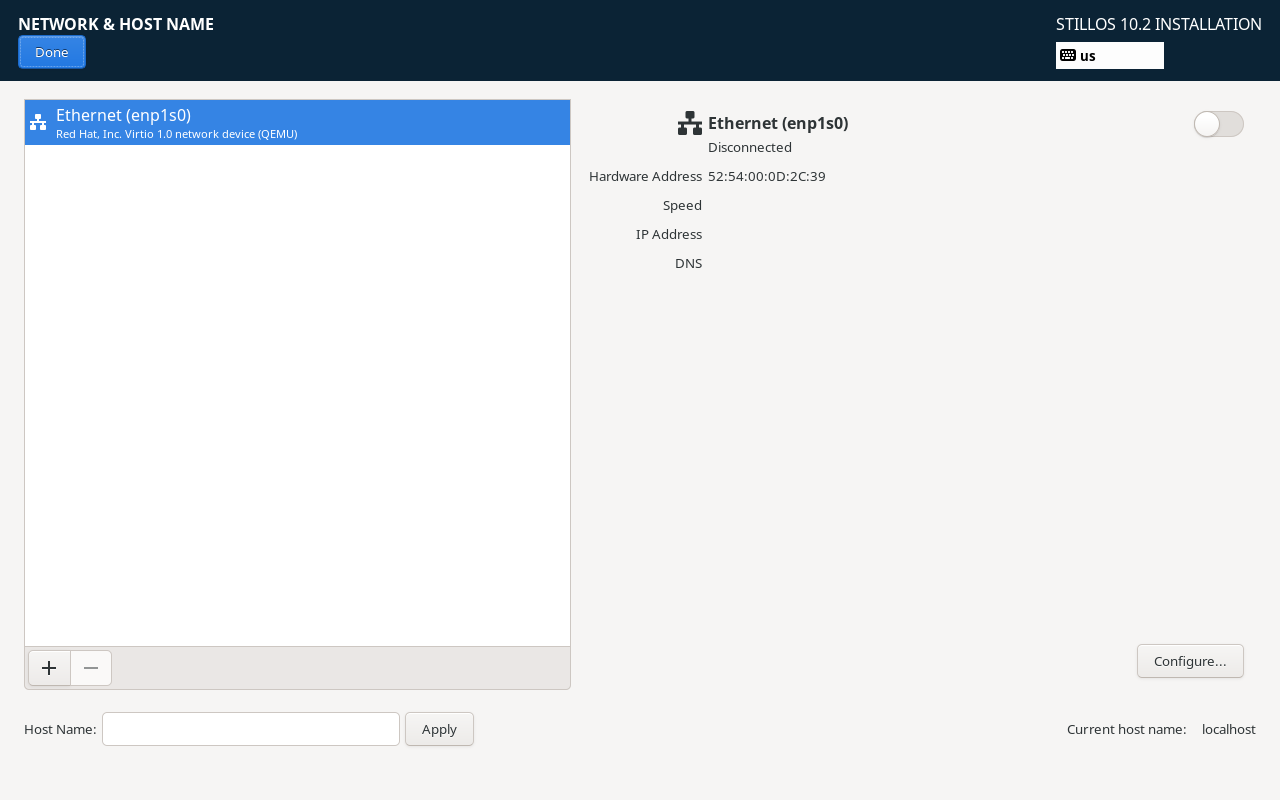 This is where you can connect the installer to the internet.
- For those with an Ethernet connection, you can simply switch on the on/off toggle on the right side.
- For those on a WiFi connection, it will show the available WiFi networks that you can connect to.
Note:
- You do not need an internet connection to install stillOS. It is there so that the device's date and time can be set automatically.
- The menu in the "Configure..." section are advanced options for the connection, the default options should work fine for most use cases.
Begin Installation
Once you are finished with everything and are on the main screen with the "Begin Installation" button being blue, you can click it to begin installing stillOS.
Note: It might take a while for stillOS to install, please be patient as interrupting the install might cause issues.
Reboot to the OS
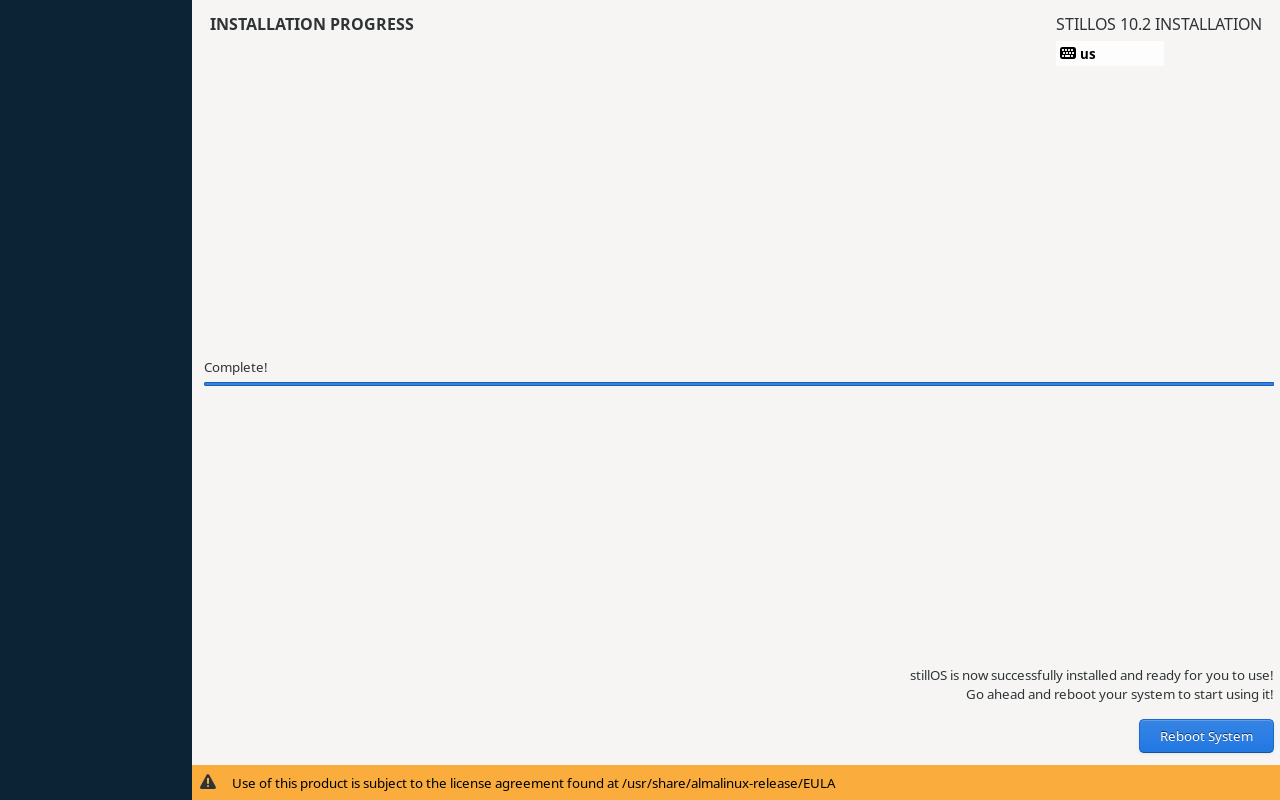 Once the install is done, you will see this on your screen. Click "Reboot System" to reboot to stillOS.
Note: If the computer reboots back to the USB installer,
- Press "Quit" to exit the installer. It might ask you to confirm whether you want to exit, click "Yes" in that case.
- Once the GRUB menu (the one that looks black and white) pops back up, press the power button on your PC to turn it off
- Unplug the USB stick, and it should boot into stillOS.
First Boot
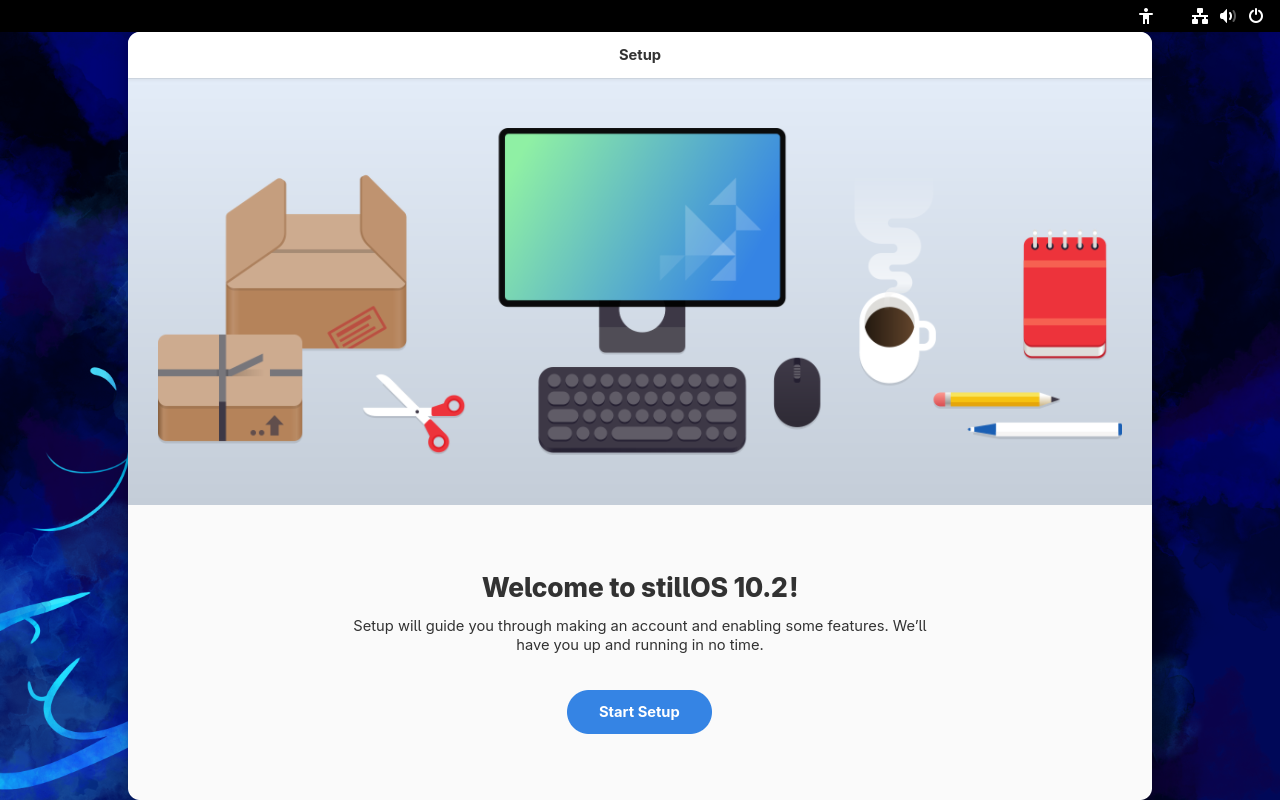 After rebooting, you should see this screen, click "Start Setup" to begin.
Time Zone
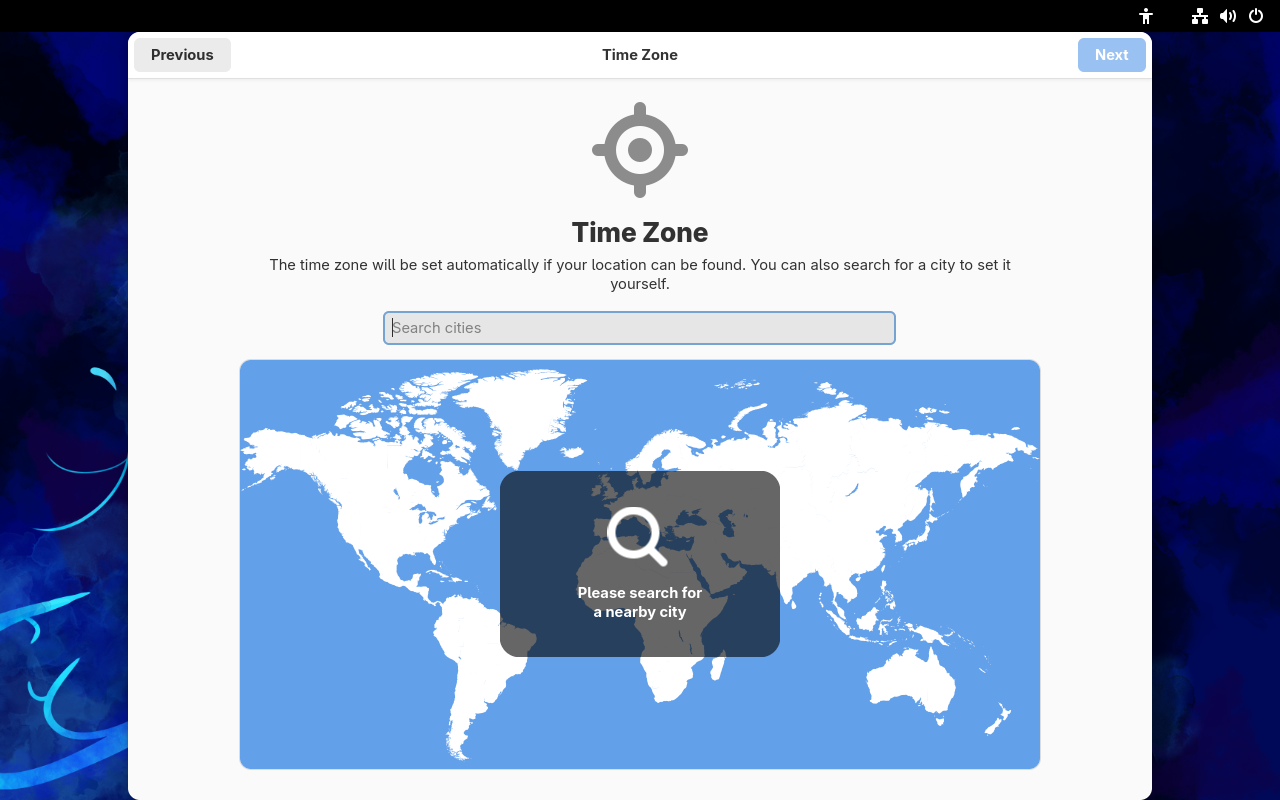 Yes, it will ask for your time zone again, just search for your city and press "Next".
About You
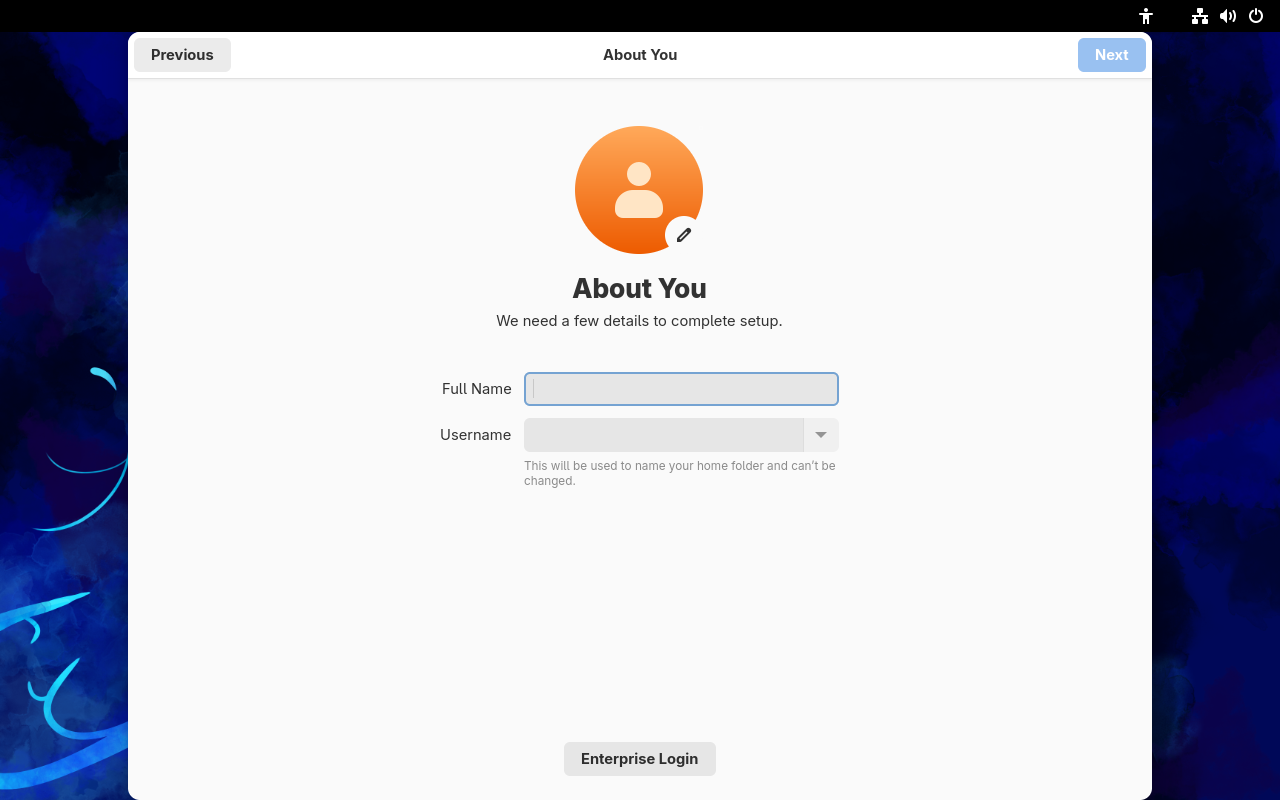 Enter your name, a username for the system will be created automatically.
Password
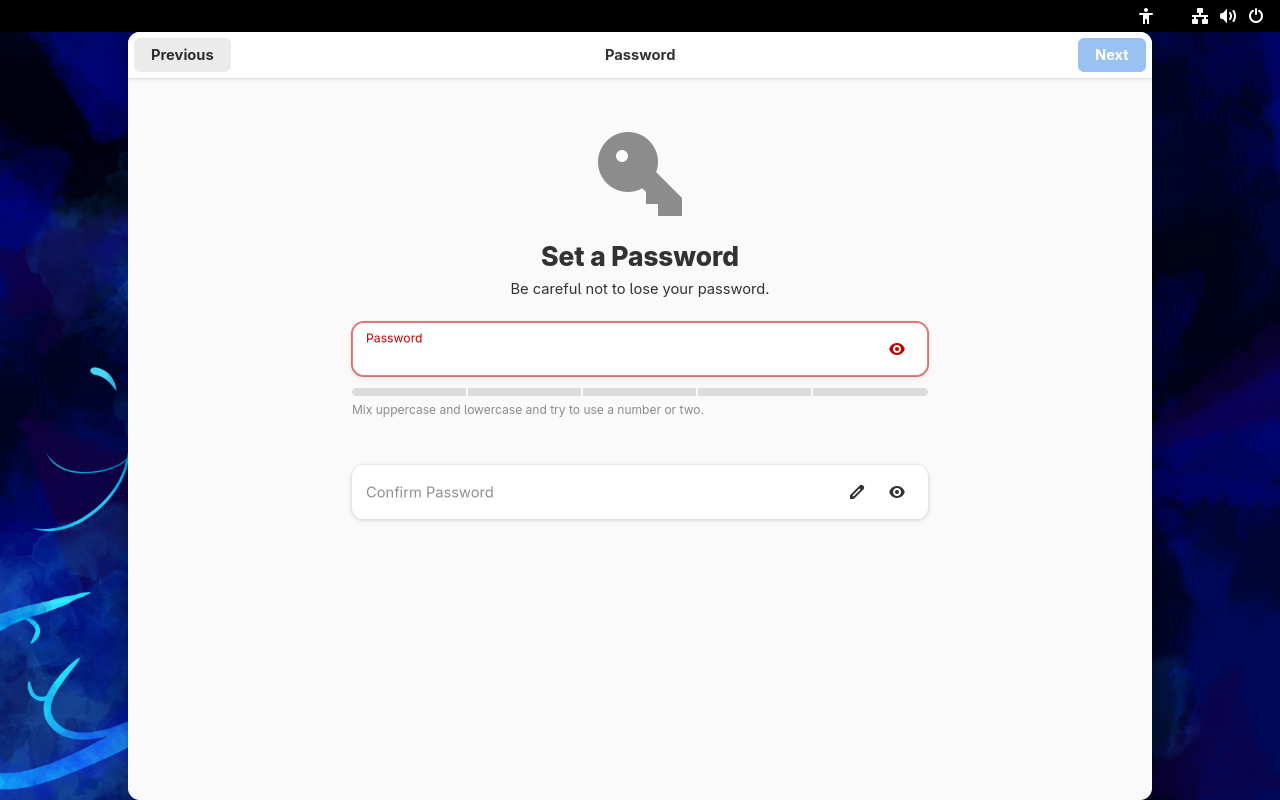 Enter a password to use. Confirm your password by typing it again. Do not forget your password.
Note: You can ignore the password strength suggestions, just make sure your passwords match so you can click "Next".
All done!
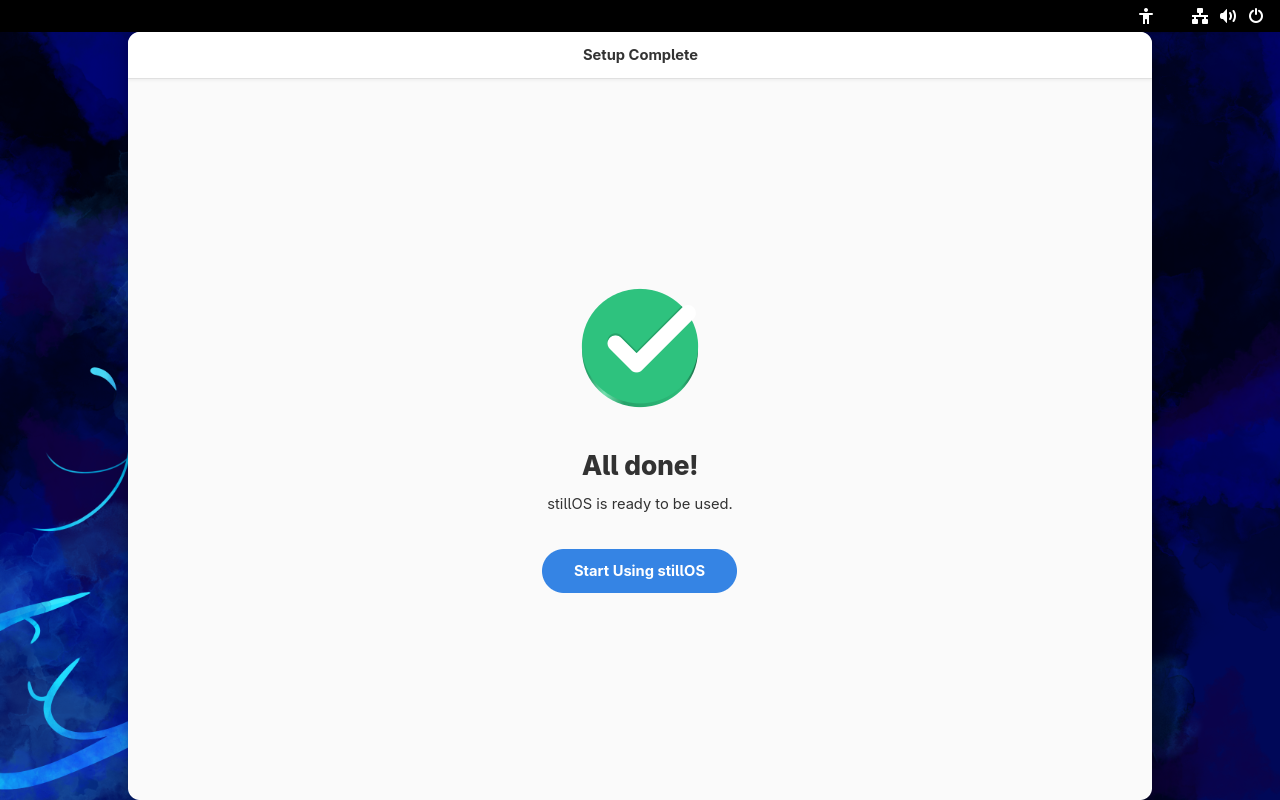 Click "Start Using stillOS" to get to the desktop and to complete post-installation steps.
Post-Install
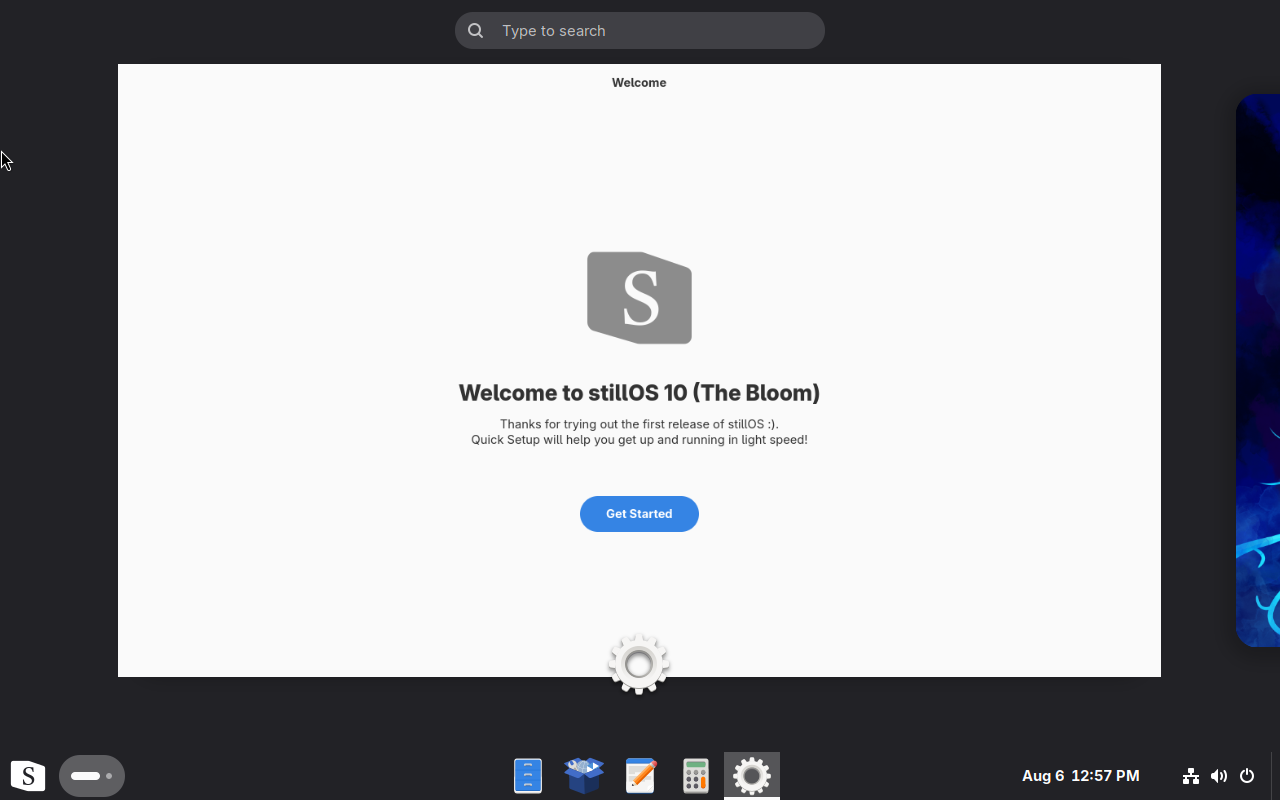 On first login, you should see this welcome screen. Click on the window to exit the overview, and click "Get Started".
Additional Driver Installation
stillOS will automatically install drivers for your hardware, be patient as they are essential for full functionality of your system.
Web Browser Selection
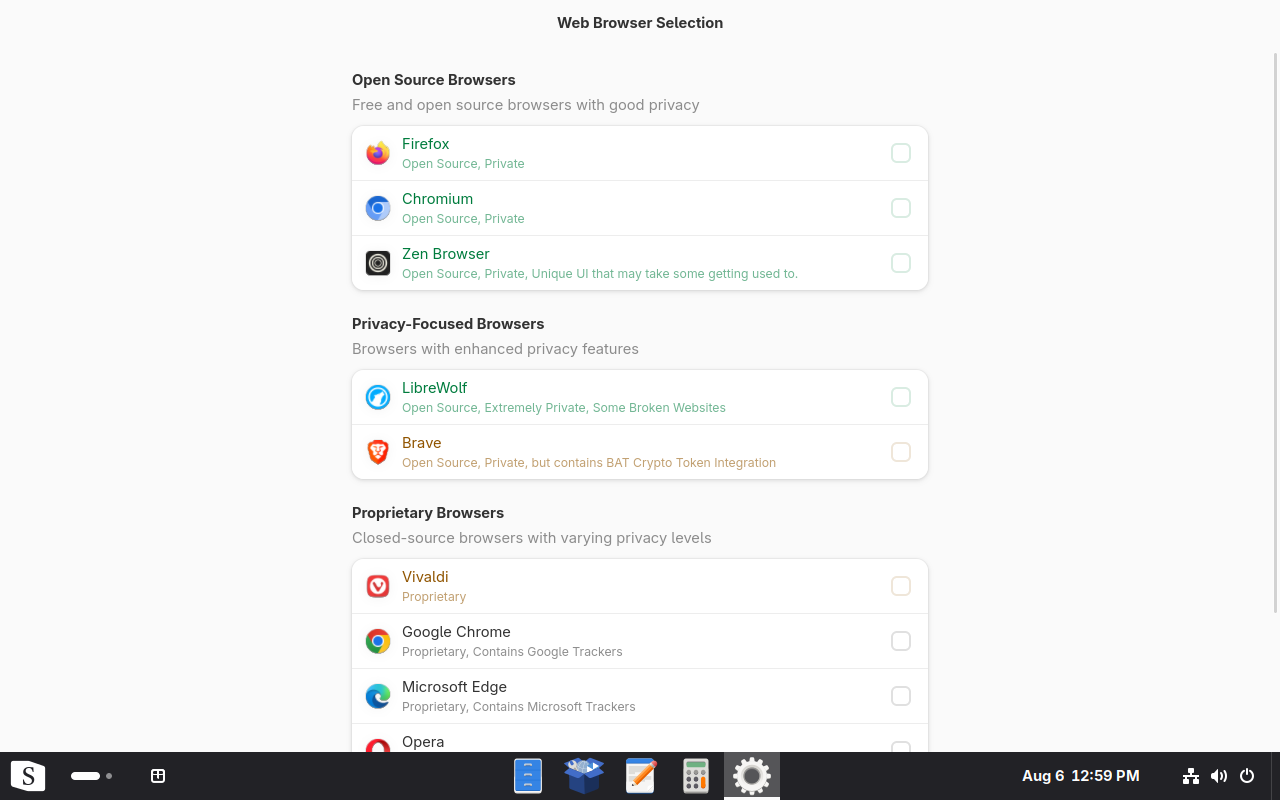 Feel free to select your preferred browser(s) here.
Essential Apps
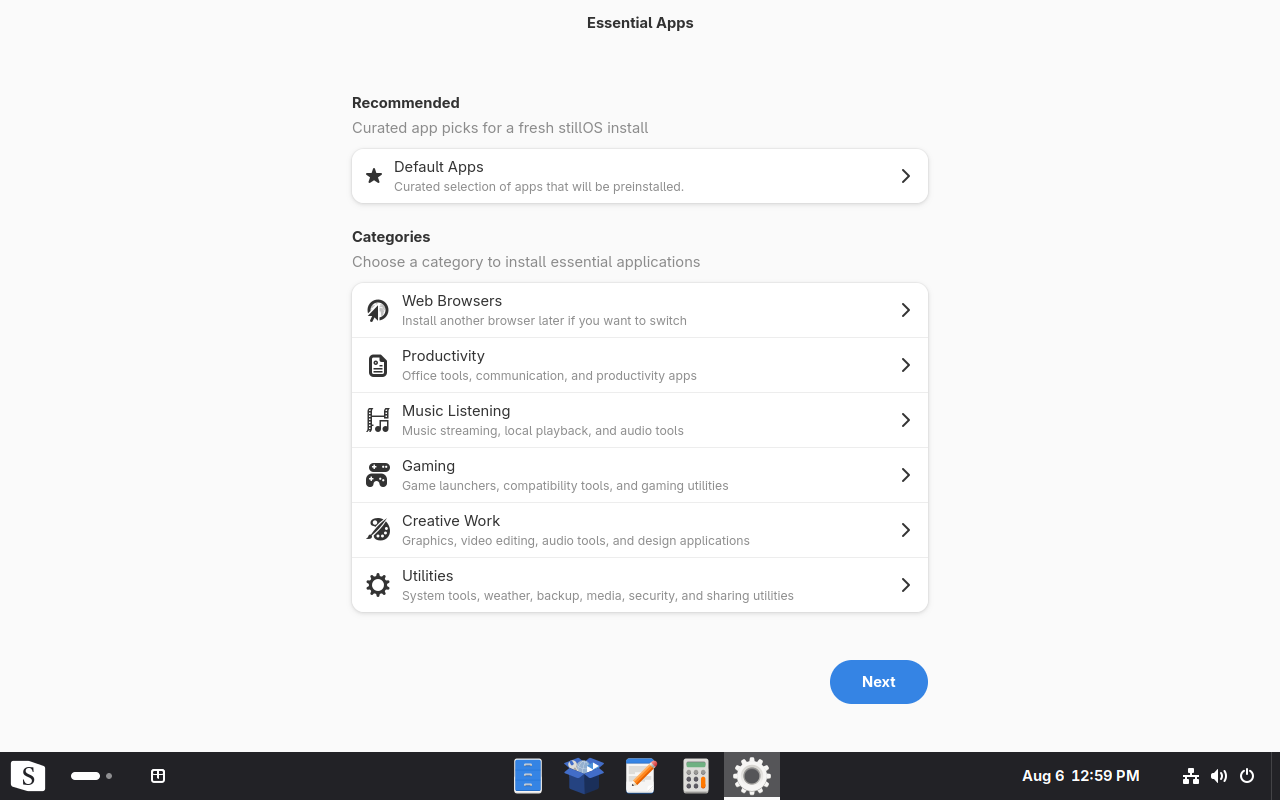 If you want to install any additional curated apps, you can do so here.
All Set!
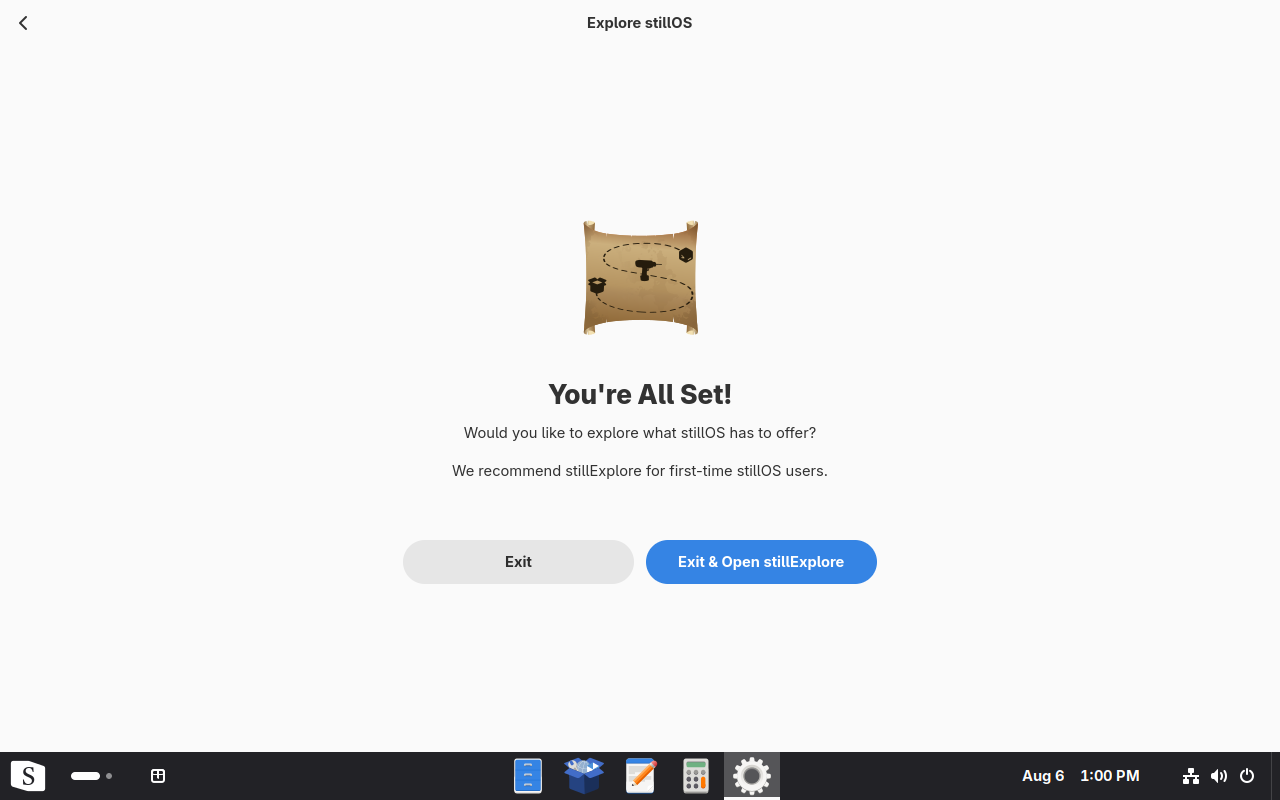 To close the window, click "Exit". It is recommended for beginners to open stillExplore as it will guide you through setting up your system, and will show you the features that stillOS has to offer.